Listing Options - How To Add & Manage Options In AutoPlayAuto.com
AutoPlay now has the ability to set up tables containing all 'Listing Options'. Listing Options are effectively Features that are available to add to new vehicles. The current use case for this function is to enable OEM's and Dealers to load the Options available within AutoPlayAuto.com, and retrieve via the AutoPlay Data API in order to list these options online in online shopping tools such as vehicle configurators.
The Listing Options menu item is only visible when the Role Attribute is added to the LISTINGS role within Role Management. As accounts may have multiple Listings roles if the User belongs to at least one role where the 'Manage Options' check box is ticked then this screen is visible to that user.
When the Role Attribute is enabled the menu item will be visible under SETTINGS>LISTING SETTINGS>OPTIONS.
Within the Options screen is a table containing all of the uploaded Options in the account. Within this screen you can search by Keyword, Makes, or Status (Any, Active, Inactive).
To view an existing option simply click on the option to view the detail screen,
On this screen you can use the 'Download List' function to export a CSV with all your current Options.
There are two methods to upload a Option to AutoPlay.
1. Manually Load
2. Import A CSV
To manually load a Option record click on the + button located on the top RHS of the application.

You can then begin loading your Option.
- Name - depending on your use case this may be what is displayed online so make sure it's descriptive and appropriate
- Type - Select a Type from the drop down from Colour, Upholstery, Option, Pack, Roof, Wheel
- Option Code - If your Option has a code in another system reference it here as a unique identifier
- Description - If you require you can add a sentence about the Option describing what it contains. You can use basic Mark Up and Mark Down in this field
- Make - Select the Make this option is available on (currently the Make is mandatory and cannot be set as Any)
- Model - If the Option is only applicable to specific Models specify it here
- Model Code - Specify the Model Code that the Option applies to
- Value $ - Add the $ value for the Option
- Active - Tick whether the Option is Active or not. Only Active records will be retrievable in the API
When you have entered these values you can click SAVE in the bottom right corner to Save your record.
To Delete your Option once saved click on the 3 dot menu shown below and select DELETE.
When you have to make bulk changes to the Options list it may be handier to
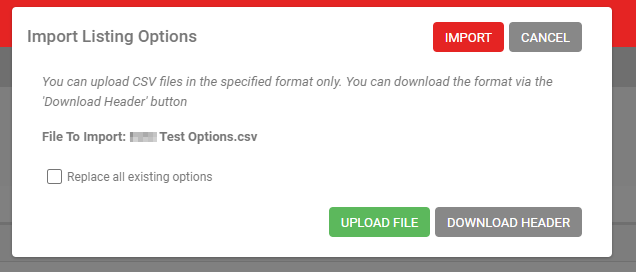
From the 'Import Listing Options' popup users can upload a CSV of all the Options. Users can either add to the existing list of Options with their upload, or if they want to replace the full list they can check the 'Replace all existing options' check box.
The Upload will only function if the file is in the correct format. If you have previously used the 'Download Options' function you can reuse this spreadsheet to upload. You can also use the 'Download Header' option here to download the template that is required in order to complete your upload.

The values entered here must match EXACTLY the way that your Option Types and Makes are set up. The rest is free text and will import whatever you specify in this spreadsheet.
If you specify an ID you can enter the AutoPlay ID of the Option to update it. This can be most useful when updating the price but retaining everything else about the Option.
The file must be saved as a CSV and must be closed on your PC before clicking the 'Upload File' button.
Once you have done so the popup will show you the 'File To Import' with the file name displayed.
Once you have done so the popup will show you the 'File To Import' with the file name displayed.
To proceed with your upload you must then click IMPORT. If you wish to replace the file you can click 'Upload File' to swap out the file chosen for upload.
This file will then be queued for upload on AutoPlays servers. This will generally upload within a few minutes but please allow 10-20 minutes for this to process.
Querying Options Within The API
There is a new API method in the Tokenised Data API to return all the Options values called ‘ListingOptions’ which is
designed to return the full table of options set up in the account. The Options are not attached to any individual listing,
but provide the API user with a list of Options that they can select from to be applied to listings online.
Example Querystring http://dataapi.autoplay.co.nz/listingoptions.ashx?dealerid=662&modelcode=5AZ111STD
Parameters to query are;
Example Querystring http://dataapi.autoplay.co.nz/listingoptions.ashx?dealerid=662&modelcode=5AZ111STD
Parameters to query are;
• &ModelCode*= (return all Options that apply to the specified ModelCode)
• &DealerID*= (return all Options that apply to the specified Dealer - in this case all options will be added to 662
only)
Response fields are;
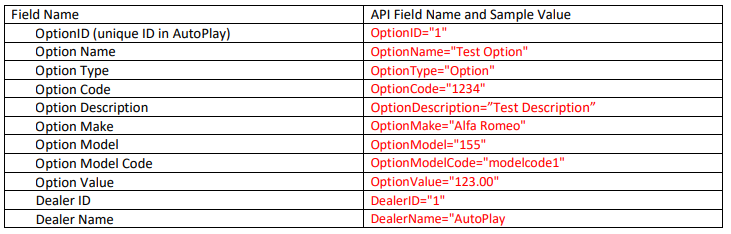
Response fields are;
Related Articles
How To Manage Lead Campaigns and Sub Campaigns
Overview Lead Campaigns can be accessed via Settings>Sales Pipeline Settings>Lead Campaigns in the main navigation menu. To view the Lead Campaign Settings screen you will need to have the Manage Sources and Campaigns Role enabled. When flagged as a ...How To Manage Audio Recordings
In wwwautoplayauto.com it's possible to manage your Audio recordings via 'Settings>Listing Settings>Audio' if you are a manager in the Company Admin or Yard Admin roles. To set up Branded Scripts for your Virtual Demos, or Default Email Audio for ...Role Management - Manage Contacts
The use of the Address Book is controlled via the 'Manage Contacts' Role. If added to the role user can view contacts and contact groups If flagged as Manager, user can add/edit/delete contacts and add/edit contact group If no role created then all ...Role Management - Manage KPI Targets
The Manage KPI Targets role enables the Dealership KPI Targets, Yard KPI Targets, Salesperson KPI Targets, Lead Sources and screens under Settings>Sales Pipeline Settings. (Note Campaign visibility is controlled by the Lead Manager Role) If the User ...Role Management - Mark Listing As Sold On Close Won
The 'Mark Listing As Sold On Close Won' role should only be used when a dealer loads manually to AutoPlay. If role is assigned to account, a new checkbox will appear on the Close Lead As Won screen if the following conditions are met: 1. The listing ...